

The do it yourself lapbook is really quite simple. Some say that it is easier than following a template and it certainly allows for more creativity. Keep in mind that it takes time to get the final layout and allowing the child to help determine the topic is a wise idea.
A variety of subjects can be included. Consider geography, handwriting, history, vocabulary, science, math, art, and spelling. That is a full day of work. Where has lapbooking been all of my home educating life?
Here are some basic steps to follow when creating your lapbook:
- Agree on a subject with your child. Try to leave it up to her. You'd be surprised how much you can learn from subjects that sound anything but educational.
- Search for relevant information online or have older child do it (google the subject and key words like kids, worksheet, facts or handout). If your child does the searching, be sure he knows how to search safely. Obviously, your child can also search for information in books, encyclopedias and other printed materials and copy facts from them.
- Cut and paste text about your subject into a document file (with fairly large print) to print out. Kids can cut paragraphs or facts to glue in, copy information from the page or otherwise incorporate it. You may want to print on colored paper, just to make it more colorful and interesting.
- Print out coloring pages, handouts, black and white maps and other creative elements.
- Use web sites like enchantedlearning.com for printouts.
- Do a google image search and print images in color (right click and select "view image" to get just the image to print).
- You can also do a google search for lapbooks that others have made on your subject. Sometimes you can find blogs where parents have posted pictures of ones their kids have made or even include links to places where they found great info and printouts.
- Print out some fun shape books or just make up pockets, flaps, etc. Put out related stickers and art supplies. Some handy supplies include double sided tape, old magazines, colored cardstock to make pockets, markers, scrapbooking supplies and embellishments. Obviously, you'll also need basics like scissors and tape or glue.
- Be your child’s helper in assembling, but give her/him full creative control.
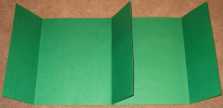
This is a guide to make a folder size lapbook.
For each lapbook, you will need a file folder. Open up the folder.
Fold each side in to meet in the middle. You will glue each of the activities into this to make a lapbook.
If you need additional room, you can add an extension. Use a sheet of card stock, or cut a file folder in half. Use wide packing tape to tape it to the top of your lapbook. Fold it down to close the book.
How to make a larger lapbook -
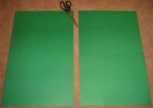
- Purchase a piece of poster board, 22"x28".
- Cut the piece of poster board in half, width-wise, so that you have two pieces of paper, 14"x22". One piece is required to make one shutter fold Portfolder. Two pieces make a double fold Portfolder.
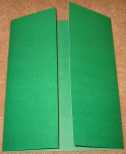
- Mark the center of the 22" length at top and bottom. Fold the right side to this center mark. Fold the left side to meet the right at the center.
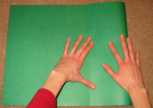
You are now looking at a one Portfolder.
- To make a double fold Portfolder, lay two singles in front of you, face up.
- Glue the outside of the right shutter of the book on your left to the outside left shutter of the book on your right. Aleene�s craft glue works well.
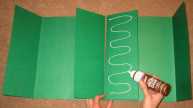
- Place heavy books on the glued section as it dries to help establish a firm bond. The double fold Portfolder now has:
- a cover
- center section #1, with flaps
- center section #2, with flaps
- back cover
The layout and paste-up can take parts of several days. Children arrange and rearrange before they find the most complimentary layout. Although I make suggestions, children make final decisions about where they think each item should go.
I hope this is helpful and gets you energized to start your first book. It is spring break here or we would begin working tomorrow. I am considering starting by making one for a chapter book we just finished reading.
Retrieved from:
by Alicia Bayer
on March 31, 2010